2008 FORD HARLEY-DAVIDSON EDITION P/U
REFINISHING METALLIC SEAT INSERTS INSTRUCTIONS
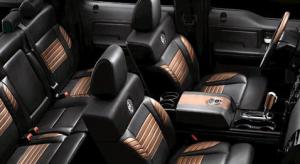 The anniversary edition Vintage Copper and Black color scheme is carried onto the interior that features Black with Dusted Copper leather-trimmed seats with logos embedded in the leather.
STEP 1:
CLEANING & PREPARATION FOR RE-COLORING & DYEING
A complete, thorough prep cleaning is the most important step in the coloring process to insure maximum adhesion of all products to the surface and durability.
Nearly all pieces are protected by coats of anti-adherent products that must be removed before proceeding with the coloring process. Always use clean lint free towels or paper towels.
.
LEATHER
1) Prep Cleaning Protected & Finished Leather:
Thoroughly prep clean the area to be repaired or re-colored with (TC) Triclean Prep Cleaner. Triclean is the only cleaner needed to remove dirt, body oils, silicones and waxes. Spray a wet coat of Triclean, use a nylon brush or a scotch brite pad to scrub completely. Take extra time on piping, leather creases and the stitching. Repeat for optimum results.
This leather has a protective coating. Use 600-grit sand paper with (TC) Triclean to wet sand. Try to avoid sanding the stitching. This helps to break the surface tension of the protective coating, which can cause peeling if not removed.
Apply (TC) Triclean again and wipe clean with a clean lint free towel or a paper towel.
STEP 2:
PRIMER
Use (95FA) Flex Primer, (HT) Water Base Hi-Tac Primer or (AFP) Aerosol Flex Primer to promote the adhesion of water base colors to the leather. Apply a medium coat of the Primer, allow to dry to touch. A hair dryer can be used to accelerate drying.
STEP 3:
DYE RE-COLOR LEATHER
The color for 2008 Harley-Davidson Edition is a 3 stage color application.
Colors needed:
First Stage: Basecoat color - #F15 Med. Dk. Sable
Second Stage: Two-tone effect - #6505 Ebony
Third Stage: Topcoat metallic - #PM-210 Gold Metallic
** Be sure to add 3% #SL7 crossliner to all the above colors.
1) First Stage: Spray 2 to 3 coats of basecoat color #F15 over entire area. Allow to air dry after each coat of color.
2) Second Stage: For a two-tone effect, turn down the air pressure setting to the spray gun and open the dye fluid flow. This will allow larger droplets of dye to be sprayed. Spray the #6505 in short bursts over the entire basecoat color. Dry completely. Spray additional coats of #6505 as needed till the overall color is dark enough.
3) Third Stage: The topcoat metallic color will slightly lighten the overall color. Spray a light coat of topcoat color# PM210 over the entire area. Dry to touch. Spray additional topcoat color as needed.
Optimum cure time 8 hrs, though you can sit on the seat when dry to the touch.
APPLYING COLOR
Classic Dye may be sprayed with mouth atomizers, prevals, crown spray tool or conventional spray guns. Set the air compressor between 40 and 60 lbs. for best results.
-Pre-mixed and pre-matched colors are ready to spray. Just shake or stir, then strain and spray.
-Spraying in hot conditions or direct sun light may cause dye to dry too quickly. This will result in an unwanted rough finish. To slow down drying time of dye, add 5-10% water or LPC as a thinner. Additional Slip additive may be added for a smoother finish. Rough finishes may also be buffed with a lint free towelette, or lightly sanded with 600-1200 grit sandpaper, then spray final coat. When spraying in cold conditions, use heat gun to dry between coats. Always warm the vinyl or leather before spraying.
|

