
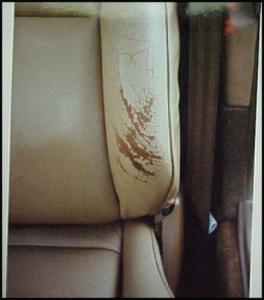
BEFORE
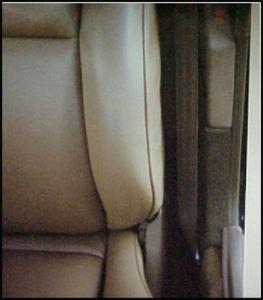
 /AFTER
.
.
.
.
.
"SELECT THE REPAIR PROCEDURE"
.
.
A) Seat panel or complete seat needs re-coloring. Leather or vinyl is in good shape.
No cuts, holes or punctures.
May have some light scratches or light cracks in the leather surface.
.

.
.
B) Cuts, holes or punctures that go all the way through the leather or vinyl that exposes the foam padding underneath.
.
STEP 1: SET-UP
1) Additional items (not provided) that may be needed:
Paper or cloth towels - Masking tape - Scissors - Hair dryer (a must to help dry the color and the repair products).
Use newspaper, drop cloth or cardboard to cover everything that is not to be repaired or re-colored.
Including carpet, kick panels, center consoles, seat belts, wooden legs, etc.
2) Wear the gloves provided during the entire process.
3) Total time required to complete most average jobs will be 1 to 2 hours.
4) Seats can be removed from the vehicle - but it is not necessary.
5) Place work materials in close proximity to work area.
STEP 2: COLOR MATCH
1) Always check the color match before starting. If the color is not close enough, the repair will not look right.
2) Be sure to check the color match by applying a small amount to an inconspicuous area on the item before applying it to the entire item. Apply a few coats of color and dry completely. Use the hair dryer to speed drying time. Remove the test color immediately with the triclean cleaner.
3) Check the color match in the viewing light. Auto seat color should be viewed in sunlight.
Furniture color should be viewed in incandescent or fluorescent lighting.
STEP 3: CLEANING & PREPPING SURFACE
NOTE: A complete, thorough prep cleaning of the material is the key to successful results in the repair and re-coloring process.
Proper preparation of the surface will insure maximum adhesion and durability of all products.
Nearly all surfaces are protected by coats of anti-adherent products that must be removed before proceeding with the coloring process. Always use clean lint free towels or paper towels.
1) Using the aerosol Triclean Prep Cleaner provided, spray the surface to be repaired then clean with the scrub pad provided.
2) With the surface still wet, use a paper towel to dry and remove dirt, silicone, body oils, conditioners and other contaminants.
3) It's best to clean and color a complete panel (seam to seam) to blend the color. Some of the original color may be removed during cleaning.
4) Clean again with a paper towel and the Triclean prep cleaner over the entire area to remove any excess residue.
Proceed to step 6 " APPLYING COLOR" if repairs are not necessary.
STEP 4: MINOR REPAIRS
4a) Repairing Surface Cracks or Creases
NOTE: Since most surface cracks are the original color coat that is cracking and not the leather or vinyl itself, sanding (smoothing) the surface is necessary.
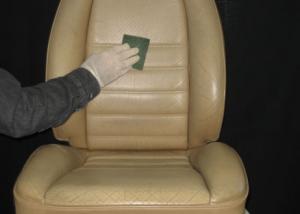
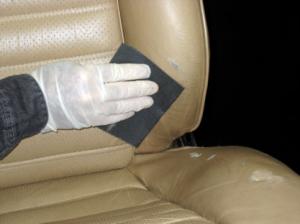
1) Wet the sandpaper (provided) with the Triclean Prep Cleaner and lightly wet sand the cracked or crease surface. This will smooth any rough or jagged edges. Sand down to bare leather if needed. It's best to work a complete panel (seam to seam) to blend the color.
DO NOT SAND THE SEAMS (where the threads are showing).
2) Clean again with a paper towel and the Triclean prep cleaner over the entire sanded area to remove excess residue.
Allow the surface to dry before proceeding. Drying time may be accelerated with a hair dryer.
NOTE: If the surface is now smooth with no cracks in the surface itself, PROCEED to STEP 6
"Applying Color".
4b) Apply Repair Compound Putty to Light Cracks, Nicks or Imperfections That Are Still in the Surface
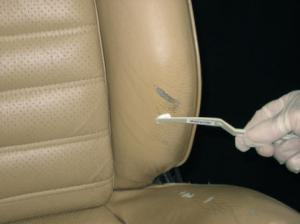
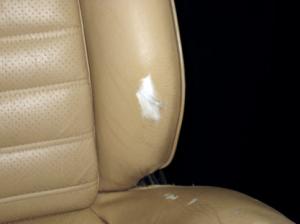
After sanding, the leather or vinyl surface still has a slight crack, nick or imperfection that goes into the surface but does not go all the way through. A repair compound is required to fill the level of the repair. Use the hair dryer to dry repair compound.
3) Remove any frayed leather or vinyl edges with nail clippers or scissors.
4) Applying the repair compound is a very important part of a quality repair. How carefully the repair compound is spread over the damaged area will determine the finished look.
5) Apply the repair compound just in the damaged area with the spatula. Use the hair dryer to speed drying. (air dry will take at least 20 minutes). DO NOT TRY TO FILL THE DAMAGED AREA IN ONE LAYER! Several layers make a stronger repair and it takes less time to dry.
6) Apply a second layer of repair compound, just beyond the edges (over lapping about 1/2") of the first layer. Continue to apply repair compound in thin coats. Use hair dryer to dry between layers as needed.
7) The repair compound should only be applied to an area not to exceed approx. 1" beyond the repair area.
8) When the repair is level with the surface, PROCEED to STEP 6 "Applying Color".
The drying time required for the repair compound will vary due to temperature, humidity and weather conditions.
Wipe the excess repair compound off of the spatula between each use.
Keep the hair dryer approx. 12 inches from the surface.
TIP: When spreading the repair compound using the spatula, keep the blade at a 45-degree angle. Begin the stroke slightly ahead of the area that you wish to repair. With light even pressure, drag the repair compound over the damaged area. Too much pressure on the blade will cause the compound to be pushed out; too little pressure will create distinctive edges where the compound stops.
To smooth the repair compound, lightly wet your finger with water and smooth the repair compound before it dries. After the repair compound dries, use the triclean to smooth the repair compound. Also light sanding is an option.
TIP: For damage caused by pet claws, use the adhesive to glue down the flap of leather to the backing or cut it off. Then follow Step (4b).
NOTE: If there are imperfections in the leather after applying color, additional repair compound STEP (4b) can still be used.
STEP 5: HOLES - RIPS - CUTS
Sub-patch Material
When the damage consists of a hole, rip or cut in the leather or vinyl, a sub-patch material is glued underneath to reinforce and add strength to the repaired area.
1) Use sharp scissors to cut any rough edges from inside the repair. Avoid making the hole or cut any larger than necessary.
2) Cut a piece of sub-patch material (provided) at least 1/2” diameter larger than the hole.
3) Replace any missing foam (cotton balls can be used) to level out the repair area.
4) Using the spatula or a pair of tweezers, push the sub-patch material under the leather/vinyl. Be certain that the sub-patch is between the leather or vinyl and the foam padding underneath. Center the sub-patch material so that it is centered in all directions under the hole.
5) Open the bottle of Adhesive provided, place the nozzle between the sub-patch material and the leather and squeeze out small amounts of adhesive. Be certain that all areas of the sub-patch material are glued to the underside of the leather. The spatula can be used to spread out the adhesive. Be sure to clean the spatula with the Triclean after using.
6) Dry completely to ensure maximum sub-patch adhesion (15 to 20 minutes) or use hair dryer to accelerate dry time.
TIP: Use light pressure with your hand, a phone book or masking tape; to hold the two pieces together until the edges are dry and bonded. Check adhesion by lightly pulling on the edges.
TIP: Remove any Adhesive from the top of the leather or vinyl with the Triclean.
7) To finish the repair - PROCEED to STEP 4b) "Apply Repair Compound"- follow the instructions
STEP 6: APPLYING COLOR
1) Be sure to check the color match.
2) Cover the surrounding work area with drop cloths, newspaper or cardboard to prevent overspray or spills onto other areas.
3) Shake color well.
4) Color should be applied in several light coats - NOT ONE THICK COAT!
The least amount of color used produces a much better finish and will last longer.
AEROSOL SPRAY COLOR:
5) Follow directions on the back of the aerosol color can.
Spraying light color coats are better than heavier color coats. The less amount of color applied, the better. Always dry between coats.
Practice spraying the color on a sheet of paper or cardboard.
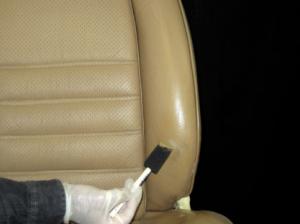
FOAM BRUSH APPLICATION:
5) Carefully remove the cap from the bottle and pour a small amount of Color into the plastic paint cup that came with your kit. Replace the cap on the bottle of Color.
6) Dip the foam brush into the Color, wetting only about the first 1/2 inch. Wipe the excess on the edge of the paint cup. Less color on foam brush will provide better results.
7) Apply a thin color coat to all repaired areas first, do not attempt to achieve good color coverage. Apply the color with smooth, even strokes. If bubbles or runs appear in applied color, use the foam brush to even out the color before drying.
8) Allow the color coat to completely dry to touch (about 15-20 minutes) before applying a second coat, it should feel smooth to the touch and not tacky when dry. Use the hair dryer to speed dry time. Don't be alarmed if the color is streaked, additional color coats will even out the color.
9) Apply a second color coat in the same manner as the first. Apply a third color coat or as many color coat’s as necessary to blend in the surrounding area; thus making the repair less noticeable.
Do not let foam brush dry out with the color on it. Continuously clean brush with water and dry with towel to insure softness and flexibility.
TIP: When applying color in cold conditions, always warm the leather or vinyl before applying first color coat. Use a hair drier to dry the color between coats.
TIP: When applying color in hot conditions, always cool the leather or vinyl before applying first color coat. Color may dry too fast and streak when applied. Cool leather to room temperature using automobile air conditioning or a damp cloth.
NOTE: Color completely cures in 24 hours. You can use the item that has been repaired within 2 hours, just be extra careful with it. This also
applies to seating surfaces.
Clear Coat: If the Clear Coat was purchased, apply it using the technique as above. This will be the final coat.
STEP 7: CLEAN UP
Overspray: If there is over-spray on anything, simply wipe it off before drying. If it has dried, try using the Triclean to remove it.
Clean Up: The color used in this kit is water based and may be cleaned by means of soap and water. Triclean or rubbing alcohol (not supplied) may also be used for cleaning application equipment. For the first couple of hours, clean-up will be relatively easy. After 24 hours clean-up will be extremely difficult. Wash foam brushes in warm water and liquid soap.
STEP 8: CONDITIONING
Leather is a natural product that wears and ages with time. This results in less flexibility and surface cracks. Just like with human skin, proper maintenance and care is essential. The conditioning treatment required will depend on the state of the material.
After re-coloring, treat the leather with (ProC) Leather Conditioner. This feeds, protects and prolongs the life of the leather. Remember to apply a minimum of twice annually to help avoid cracks and further damage.
1) Allow the Color to completely dry (allow 24 hours), then apply ProC Leather Conditioner with a soft towel over on the entire area. Allow to dry. Buff lightly with a clean soft cloth.
2) Use the Leather Cleaner/Conditioner for daily or weekly ongoing maintenance and protection of leather.
3) Use the ProC Leather Conditioner on all leather seating at least twice a year for deep penetration of fine natural oils.
NOTE: Use caution for the first 24 hours, the new color finish may be damaged by liquids, chemicals or heavy wear. After the 24-hour cure time, the new color coat has achieved maximum performance levels and durability.
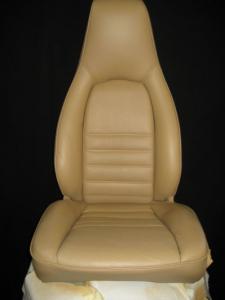 Finished seat
